How to Grow Rose (bare-rooted)
Grow Guide #3001
Family: Rosaceae
Binomial name: Rosa sp.
Life Cycle: Perennial
This 'How to Grow' guide details everything a home gardener needs to know to plant, grow and care for Roses (Rosa sp.).
What is a bare-rooted rose?
Roses are long-lived perennial plants that have a period of winter dormancy each year, and this is the ideal time to dig them up and transplant them - before they start spending energy on producing new roots, leaves and flowers.
Bare-root roses are only available seasonally as they are dug up during their winter dormancy. They are usually younger rose plants that have been trimmed back and had the soil washed from their roots. They are easier to transport as they have no leaves or flowers at this stage, and the roots are packed in moist coir to prevent them from drying out during shipping.
When to Plant Bare-rooted Roses
Bare-root roses should be planted soon after you recieve them. Use the table below to identify the best time of year to plant bare-rooted roses in your climate.
| JAN | FEB | MAR | APR | MAY | JUN | JUL | AUG | SEP | OCT | NOV | DEC | |
|---|---|---|---|---|---|---|---|---|---|---|---|---|
| Cool | ||||||||||||
| Temperate | ||||||||||||
| Sub-Tropical | ||||||||||||
| Tropical | ||||||||||||
| Arid |
Preparation
Roses are easy to grow and will grow in most climates. Selecting the right rose for your climate and providing the right care will help ensure success.
Temperate and cool to cold climates: Most roses grow well in these conditions.
Subtropical and tropical climates: Roses may be more susceptible to fungal diseases in more humid areas. Choose disease resistant varieties and ensure good air flow around plants.
Arid climates: Roses with thicker leaves and petals do well in hot, dry climates. Provide extra water and protection from the hot summer sun if necessary.
Roses do best in a sunny position that gets at least 6 hours of sun per day. The less sunlight they receive, the less vigorous the plant will be and they will produce fewer flowers.
Rose plants need a loose, well drained soil enriched with organic matter. Prepare soil by weeding it thoroughly, digging it over to at least a spade’s depth to loosen the soil, and adding aged animal manure or compost. Organic matter can be dug into heavy soil to lighten it so roots can grow freely. Keep the area free of weeds until planting. Learn more about preparing soil for planting here.
The soil pH for roses should be between 6.5 and 7. It can take several months to change the soil pH, but after testing the soil, and if necessary, lime can be used to increase the pH, and organic matter, iron chelates or powdered sulphur can be used to lower the pH. The quantity required will depend on soil type, pH level and the product used. Follow the manufacturer’s instructions on the container.
Do not replant roses into old soil where roses have been removed as there may be residual disease in the soil and your rose will fail to thrive. The soil can be completely replaced with fresh new soil, or it can be allowed to rest for an extended period of time.
How to Plant Bare-rooted Roses
Plant bare-rooted roses soon after delivery. Do not allow the roots to dry out. Do not add fertiliser to the planting hole as this might burn the roots and stunt new growth.
- Remove from the bag and soak roots in plain water for 24-48 hours prior to planting.
- Choose a location that gets at least 6 hours of sun per day.
- Dig a hole 30cm deep and create a mound in the bottom.
- Spread roots around and down the mound.
- Ensure soil mark on stem is level with the surface of the soil. Partially backfill and gently firm down soil.
- Fill the hole with water, allow it to settle, finish filling the hole and water in well.
- Trim stems to approx 20cm above the graft and 1cm above a bud.
- Water regularly for the first year until the plant is established.
- Do not apply fertiliser until the rose flowers.
How to Grow Roses
Watering: Roses are relatively drought tolerant once established. If it hasn’t been raining, provide a deep soak once a week in the cooler months and twice a week in the warmer months. Roses are deep-rooted so a deep soaking is better than frequent light watering which encourages shallow surface roots to develop.
Fertilising: Roses are heavy feeders as they put a lot of energy into flowering. Fertilising is best done three times a year; at the first flush in spring, the start of summer, and at the start of autumn. Do not fertilise in winter or at the time of planting. Organic, pelletised or liquid fertiliser can be used. Follow the manufacturer’s instructions on the container.
Deadhead rose flowers regularly during the growing season. Using sharp secateurs or snips cut fading or dead flowers off just above a set of leaves. Removing old flowers regularly will encourage plants to produce more flowers. Learn more about deadheading flowering plants here.
If growing roses for cut flowers, use sharp snips or secateurs to cut the longest stems possible, removing the lower leaves and placing the stems immediately in a clean bucket of water. Learn more about cutting and conditioning homegrown flowers here.
How to Prune Roses
Pruning helps to control size and neatness, encourages strong growth, and helps maximise flower production. Pruning is not difficult - simply follow these steps, and make your cuts just above a bud. Choosing an outward-facing bud helps to prevent branches from crossing over. Pruning is best done mid to late winter or early spring.
- Remove 2/3 of the plant height.
- Remove any dead or diseased wood, cutting neatly right at the base of the stem.
- Remove remaining foliage.
- Remove any spindly, untidy shoots.
- Remove any branches that cross over others to reduce crowding in the centre.
- Remove old branches that are not performing.
- Remove any suckers that may be growing from below the graft union.
After winter pruning, roses can be sprayed with Lime Sulphur which helps eliminate fungal spores and the eggs of pests. This is particularly helpful in gardens that are more humid and prone to having problems with black spot and mildew during the growing season. Follow the manufacturer’s instructions. Note: Lime sulphur spray may defoliate plants, so it is best to use it only after pruning in winter when the plants are dormant.
There are some exceptions to the pruning advice given above:
Heritage, Old Fashioned, and Species Varieties - require little to no pruning beyond removing any old or dead wood. They can be very lightly trimmed to keep the plant neat.
Climbing roses - do not prune the main canes as they are the support structure of the plant and do not produce many flowers. Lateral canes grow from the main canes and these canes produce the flowers. They are usually tied to a support and trained over pergolas or trellises to produce the desired effect. Remove any dead wood and unproductive canes. Trim lateral growth to about 6-8 cm, leaving a minimum of three growth buds.
Ground cover roses - need little to no pruning. Removing dead heads and giving them a light trimming now and then is all that is required to keep plants neat and tidy.
Standard roses (grown on a straight upright stem) - are pruned the same way as bush roses. Ensure standard roses are supported and tied to a stake as they will get top-heavy when in full flower and may topple over. Ties should be secure but not restrictive.
Common Problems when Growing Roses
Like all plants, roses are susceptible to some pests, diseases and other problems. Below is a list of the most common problems gardeners encounter when growing roses:
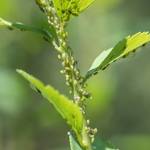
 Aphids are small (2-4mm long) sap-sucking insects that congregate on the new shoots or the undersides of leaves. They can cause leaves to wilt or become discoloured, and also excrete honeydew which can attract ants and other insect pests. To manage aphids, remove them by spraying with a garden hose, apply a soap or alcohol spray, or encourage predatory insects to your garden. Read more about aphids here.
 Grey mould (Botrytis sp.) is a fungal disease that causes flowers to become mouldy and fruit to rot. Spores are transported by wind and can survive in soil or on green waste. The fungus spreads most in cool, damp weather. Prune off affected flowers and fruit, water plants at soil level (not on leaves) and if necessary spray with an appropriate fungicide or homemade spray.
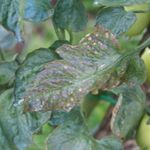
 Downy mildew is a fungal disease that causes yellow to grey-brown patches on leaves, especially the undersides. Water plants at soil level (not on the leaves), remove and destroy affected leaves and do not overcrowd plants to ensure adequate air flow. If problems persist, spray with a homemade milk spray or fungicide.
 Rust (Puccinia sp.) is a fungal disease that causes brown to orange raised spots or patches to appear on foliage. Fungal spores are spread by wind or water to neighbouring plants, especially in temperatures of 10-20C and when humidity is high. To manage rust, space plants to avoid overcrowding, grow them in the recommended amount of light (eg full sun), do not over fertilise crops, remove dead plants and practice crop rotation. Read more about rust fungus here.
.jpg) Powdery mildew is caused by fungal spores reproducing on the leaves of plants. First showing as white spots on leaves, affected areas can spread quickly to cover the entire leaf surface. While rarely fatal, powdery mildew can reduce yields. Water plants at soil level (not on leaves) to prevent spreading spores, allow good air flow between plants, remove affected leaves and if necessary spray with an appropriate fungicide or homemade spray. Read more here about powdery mildew here.
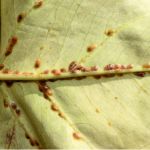
Powdery mildew is caused by fungal spores reproducing on the leaves of plants. First showing as white spots on leaves, affected areas can spread quickly to cover the entire leaf surface. While rarely fatal, powdery mildew can reduce yields. Water plants at soil level (not on leaves) to prevent spreading spores, allow good air flow between plants, remove affected leaves and if necessary spray with an appropriate fungicide or homemade spray. Read more here about powdery mildew here. Scale are a diverse group of sap-sucking insects that congregate on the new shoots or the undersides of leaves. They may be hard or soft bodied and brown, orange, grey or white. Scale can damage leaves and also excrete honeydew which can attract ants and other insect pests. To manage scale, brush or hose them off leaves, apply a soap spray, or prune off heavily infested leaves and shoots. Read more about scale here.
 Thrips are black, beige or white flying insects (<1.5mm) with larvae that suck tissue from leaves and petals, leaving behind very small white or transparent markings. While not usually causing serious damage, the marks affect the look of flowers and foliage and thrips can also transfer pathogens from one plant to another. Wash thrips from affected plants using a garden hose, encourage predatory mites and lacewings with companion planting, or spray with soap, eco-oil or neem oil.


.png)


